How To Use a Hardware Wallet: A Complete Guide
- Slava Jefremov
- Jul 9, 2025
- 7 min read

Updated: Dec 17, 2025

Introduction
If you’re ready to take the security of your cryptocurrency holdings seriously, a hardware wallet is an essential tool. You may already know its advantages over a software ("hot") wallet: it keeps your private keys offline, minimizes exposure to digital threats, and grants you full sovereignty over your crypto assets. Perhaps you’ve even chosen a device.
The good news is that while there are several excellent options available—from industry leaders like Ledger and Trezor to newer multichain wallets—the fundamental setup and usage principles are remarkably similar.
This guide will walk you through the entire process, from unboxing and verifying your device to setting your PIN, backing up your recovery seed phrase, and performing transactions securely. For illustration purposes, we will use the Trezor Safe 3, a device that is both beginner-friendly and powerful enough for advanced users. Let's get started.
Key Takeaways
Offline Security: The primary function of a hardware wallet is to keep your private keys completely offline, protecting them from online threats like malware, viruses, and phishing attacks.
Full Self-Custody: Unlike storing crypto on an exchange, a hardware wallet gives you absolute control and ownership of your assets. You are your own bank.
Physical Verification: Every transaction (sending, signing) must be physically confirmed on the device's screen using its buttons. This is a critical security step that prevents remote hacking.
The Recovery Seed is Everything: Your recovery seed phrase (usually 12 or 24 words) is the only backup of your crypto. Guard it meticulously and never store it digitally. If you lose your device, this phrase is how you'll restore your funds.
Device Integrity is Crucial: Always inspect a new hardware wallet for tampering before setup. Check that the packaging is sealed and any holographic security stickers are intact.
Unboxing Your Crypto Cold Wallet
Before you begin the setup, it’s important to know what to expect. A typical hardware wallet package, like the Trezor Safe 3, will contain the following:
The hardware wallet device (e.g., Trezor Safe 3) with a tamper-evident seal.
A USB-C cable for connecting to your computer.
Two recovery seed cards for writing down your wallet backup phrase.
A quick-start guide.
Branded stickers.
First Steps: Inspect and Verify
This is a non-negotiable security step. Before plugging anything in, carefully inspect the package.
Check for sealed, undamaged packaging.
Ensure the holographic sticker over the device's USB port is intact and untampered with.
This process verifies that your device has not been compromised between the factory and your hands. If anything looks suspicious, do not proceed. Contact the manufacturer's support team immediately.
Once you are satisfied, peel the security sticker off the USB port and connect the device to your computer. It will power on automatically. You’ll notice a small screen and two physical buttons; these are the core components you'll use to manage and secure your crypto.
Hardware Wallet Setup: A Full Guide
The initial setup process typically takes 10-15 minutes. For this walkthrough, you will need your computer and a pen.
Step 1: Download the Official Software
Navigate to the manufacturer's official website (e.g., trezor.io) and download the dedicated application, such as Trezor Suite. It is available for Windows, macOS, and Linux, and can also be accessed via a web browser. Launch the app, plug in your device, and follow the on-screen prompts.
Step 2: Install the Firmware
For security reasons, many hardware wallets ship without pre-installed firmware. The software will prompt you to install the latest version. This ensures you are starting with a clean, verified, and up-to-date system.
Step 3: Verify Device Authenticity
The software will perform an authenticity check to confirm you have a genuine device. You will likely be asked to confirm an action on the hardware wallet itself by pressing a button.
Step 4: Create a New Wallet
The software will present you with two options:
Create new wallet: Choose this if this is your first time using the device.
Recover wallet: This option is for restoring a previous wallet using an existing recovery seed phrase.

Step 5: Choose Your Backup Method
You may be offered different backup options. For most users, the Standard Seed Backup is the best choice. Advanced options like a Shamir Backup (which splits the seed phrase into multiple parts) are available but require a deeper understanding of the security trade-offs.
Step 6: Write Down Your Recovery Seed Phrase
This is the single most important step in securing your crypto. The device will generate a unique list of 12 or 24 words. This is your recovery seed phrase.
Write these words down carefully on the provided recovery seed card.
Never take a photo of your seed phrase.
Never store it in a password manager, text file, or any digital format.
Never enter it into any website or application unless you are performing a recovery on a legitimate hardware wallet.
Store this card in a safe, private, and durable location. Consider making a second copy and storing it in a separate secure location.
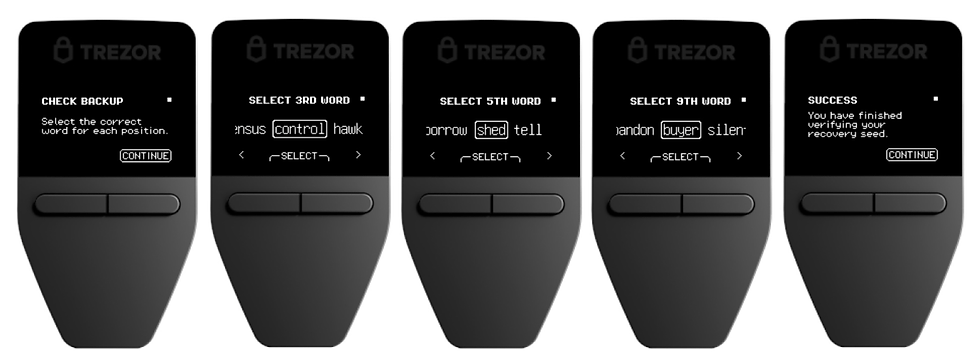
Step 7: Verify Your Backup
To ensure you have written the words down correctly, the device will test you. It will ask you to re-enter a few of the words from your list. Once confirmed, your backup is complete.
Step 8: Set a PIN
Next, you will create a PIN for your device. This PIN protects your device from unauthorized physical access. The device screen will display a scrambled number pad, and you will use the corresponding positions on your computer screen to select your digits.
PINs can be 4 to 50 digits long. Choose something memorable but not easily guessable. If you forget your PIN, your only option is to wipe the device and restore it using your recovery seed phrase.
Step 9: Finalize Setup
You can now enable the cryptocurrencies you want to manage (e.g., Bitcoin, Ethereum) and give your device a custom name. Once complete, you can access your wallet's dashboard.
Congratulations! You have successfully set up your hardware wallet and taken a major step toward securing your digital assets.
How to Receive Crypto
Open the Account: In the software (e.g., Trezor Suite), select the account for the crypto you want to receive (e.g., Bitcoin #1).
Generate an Address: Click the "Receive" button. The software will display a receiving address.
Verify on Device: The hardware wallet's screen will also display the address. This is the most critical step. Physically compare the address shown on your computer screen with the one on your hardware wallet's screen. They must match exactly. This protects you from "clipboard hijacking" malware on your computer.
Copy and Share: Once verified, copy the address and share it with the sender. You can disconnect your wallet; the funds will be sent to that address on the blockchain and will appear in your balance the next time you connect.
How to Send Crypto
Initiate the Transaction: In the software, go to the relevant account and click "Send."
Enter Details: Paste the recipient's wallet address and enter the amount. Double-check the address for accuracy.
Set the Fee: Choose a network fee (higher fees lead to faster confirmation times). The software will provide estimates.
Verify on Device: Click "Review & Send." Your hardware wallet will now display all the transaction details: the recipient's address, the amount, and the network fee.

Confirm Transaction: Carefully review these details on the device's screen. If everything is correct, physically press the button(s) on the device to approve and sign the transaction. If anything is incorrect, cancel immediately.
Your private key never leaves the device. It simply signs the transaction and broadcasts it to the network.
Conclusion
Mastering a hardware wallet is a simple yet profound step in your crypto journey. From the initial inspection of the tamper-proof seal to the meticulous process of backing up your seed phrase and physically confirming transactions, each step is designed to build a fortress around your digital assets.
In an era where digital asset security is constantly challenged, a hardware wallet is more than just a gadget; it is a declaration of financial self-sovereignty. It represents the gold standard for security, shifting the power from vulnerable third parties and online platforms directly into your hands.
Whether you are a long-term Bitcoin holder, a DeFi enthusiast interacting with complex protocols, or an NFT collector, the principles of offline key management are universal. As the crypto ecosystem continues to expand in 2025 and beyond, this secure foundation is not just recommended—it's essential. By taking this step, you are not just storing crypto; you are taking full ownership of your digital future, backed by the peace of mind that only top-tier security can provide. Looking for more? Don't forget to check our educational articles in our Blog.
Frequently Asked Questions
What happens if I lose my hardware wallet or it breaks?
Your crypto is not stored on the device itself; it is on the blockchain. As long as you have your recovery seed phrase, you can buy a new hardware wallet (from any compatible brand) and use the "Recover wallet" option to restore full access to your funds.
What is the difference between a hot wallet (like MetaMask) and a cold wallet (hardware wallet)?
A hot wallet is connected to the internet, making its private keys more vulnerable to online attacks. A cold wallet (hardware wallet) keeps private keys offline at all times, providing a much higher level of security. You can, however, connect your hardware wallet to interfaces like MetaMask to securely interact with DeFi and dApps.
What happens if the company that made my wallet goes out of business?
Your crypto would still be safe. Hardware wallets use open industry standards (like BIP39 for recovery seeds). You could use your seed phrase to recover your wallet on a different manufacturer's device or with a compatible software wallet.
Can someone steal my crypto if they steal my device?
No, not without your PIN. After a few incorrect PIN attempts, most devices will automatically wipe themselves. Even if they get past the PIN, they would need physical access and advanced tools to attempt to extract the keys, which is extremely difficult. The primary defense against theft is a strong PIN and keeping your recovery seed phrase safe.
Why do I have to verify the address on the device's screen?
Malware on your computer can intercept an address you copy and paste, replacing it with an attacker's address. By confirming the address on your hardware wallet's isolated, secure screen, you ensure that you are sending funds to the correct destination. This is one of the most important security features of a hardware wallet.


Comments